Instrument Scanning Techniques
Instrument Scanning Techniques
Training Notes: Instrument Scanning Techniques
This section introduces the fundamental skills required for instrument flying and discusses instrument scanning techniques for both analog and glass cockpit airplanes.
Fundamental Skills:
- Develop three essential skills:
- Instrument Scan: Proper scanning of instruments.
- Instrument Interpretation: Understanding and interpreting instrument readings.
- Airplane Control: Controlling the aircraft based on instrument information.
- These skills are learned separately and sequentially but become integrated for smooth and positive control of the airplane on any flight path.
Instrument Panels:
- Types of instrument panels:
- Analog (Round-Dial) Instruments
- Glass Cockpit (LCD Representations)
- Understanding both types is beneficial, but focus on the type you will be flying.
- Instrument scans are similar for both, but instrument interpretation may differ. Aircraft control remains identical.
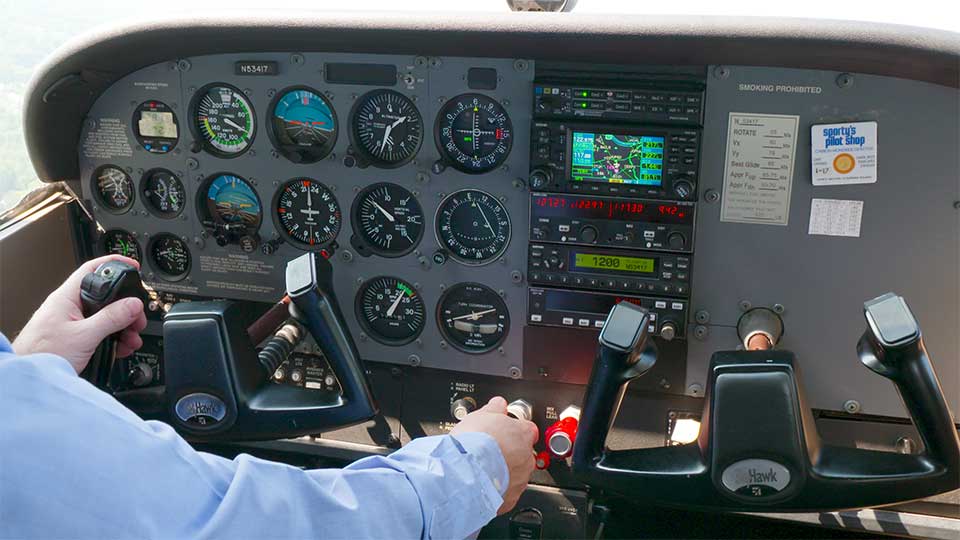
Analog Instrument Panel Layout:
- Standard "T" arrangement:
- Airspeed Indicator: Top left position for easy visibility during takeoff and landing.
- Attitude Indicator: Centered as it is the primary focus.
- Altimeter: Top right of the "T".
- Heading Indicator: Forms the vertical leg of the "T".
- Turn Indicator/Coordinator and Vertical Speed Indicator: Fill in the left and right sides.
- Other controls and gauges may not have a standard arrangement and can be positioned randomly.
Glass Cockpit Instrument Layout:
- Primary Flight Display (PFD):
- Attitude Indicator: Dominant display for constant visibility; fills the full screen or top half.
- Airspeed and Altitude: Represented by tapes with digital readouts; airspeed on the left, altitude on the right.
- Slip-Skid Indicator: Displayed below the attitude indicator using shapes to represent the ball; interpreted similarly.
- Heading Indications: Can be shown using a round HSI or an arc below the attitude indicator; user-selectable.
- Rate of Turn: Displayed at the top of the heading indicator with trend lines and tick marks. Extending the trend line to a tick mark gives a standard or half-standard rate turn.
- Vertical Speed: Representation varies between systems (tape, pointer, rotating needle, or numeric value); location varies.
- Backup analog instruments (attitude indicator, altimeter, airspeed indicator) may be located anywhere on the panel.
Developing Your Scan:
- Sit in the airplane to familiarize yourself with the location of switches, indicators, and controls.
- Being able to find controls without hunting enhances your scan.
- An external power source can be helpful when practicing with a glass cockpit.
- If renting, use the same airplane or one with the same instrument arrangement to reduce workload during training.
- Knowing which instrument to look at is crucial.
- Understand the information each instrument provides.
Instrument Flying Techniques:
- Instrument flying mirrors visual flying but uses the attitude indicator instead of the natural horizon.
- The attitude indicator is used to establish and maintain aircraft attitudes.
- Performance instruments are used to verify the results of attitude changes.
- The attitude indicator is not a performance instrument; cross-check with performance instruments like the altimeter and heading indicator.
- Most of your scan time will be spent on the attitude indicator.
- Instrument flying is more precise due to increased attention to performance instruments.
Scan Patterns:
- No single scan pattern works for all pilots.
- Proficient pilots scan all instruments, with the attitude indicator receiving up to two-thirds of the scan time.
- Adjust your scan rate and sequence based on the flight situation.
- In glass cockpits, scan patterns are similar, but instrument information locations differ.
- Advantages of glass cockpits:
- The attitude indicator remains in sight while viewing other instruments.
- Potential disadvantages:
- Tape-style instruments may require more time to interpret compared to analog needles.
- As a beginner, slow down your scan:
- Get the message from each instrument before moving to the next.
- With experience, you'll need less time to interpret instruments.
Common Scan Errors:
- Omission of Instruments:
- Skipping an instrument, such as not checking the altimeter when leveling off.
- Emphasizing One Instrument:
- Relying too much on one instrument while neglecting others.
- Fixation:
- Staring at one instrument, especially when approaching a target altitude or heading.
- Common when trying not to overshoot altitudes or headings.
- Pilots may fixate on bank instruments more than pitch instruments due to airplane stability.
By understanding and practicing effective instrument scanning techniques, you will enhance your proficiency and safety as an instrument pilot. In the next section, we'll explore the four fundamentals of flight in greater detail.